iFreedom Help
Listed below are the various iFreedom apps
| App Name | Platform Type | Live | PlayBack | Approx Cost |
|---|---|---|---|---|
| iFreedom | iPhone | Y | Y | Free |
| iFreedom | Android | Y | N | Free |
| iFreedom Pro | iPhone | Y | Y | Paid | iFreedom HD | iPad | Y | Y | Paid |
| ∗Note: Prices & features may change without notice | ||||
iFreedom allows you to view cameras from Freedom Servers™
Recorders can be group together into site names
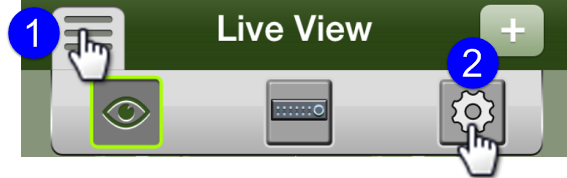
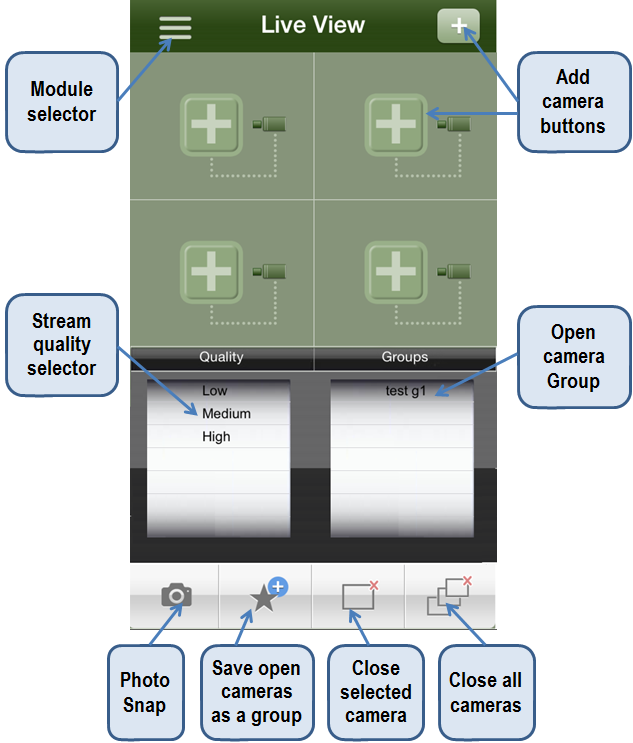
iFreedom Live View Layout;
Buttons Descriptions
 Add camera button, used to select camera from recorders.
![]() menu selector button, opens the menu bar.
menu selector button, opens the menu bar.
 Quality select wheel, allows you to choose between different quality transcoded streams.
 Favourites group selector, allows you to select, previously saved groups of cameras.
![]() Allows you to take a snapshot of the currently selected (highlighted) tile.
Allows you to take a snapshot of the currently selected (highlighted) tile.
 Allows you to create a favourite group from the currently streaming cameras.
 Close live video on selected camera tile.
 Close all live video on all camera tiles.
 Create a new Site. A site is a logical entity representing a group of devices.
![]() Drag handle, used in Device Manager to re-arrange the order or devices & drag devices into logical Sites.
Drag handle, used in Device Manager to re-arrange the order or devices & drag devices into logical Sites.
 Used to export your current device list via email.
Menu selector options
By clicking on the "menu selector" ![]() icon you can navigate between Live view, Playback, Device Manager and Help ⁄ about modules.
icon you can navigate between Live view, Playback, Device Manager and Help ⁄ about modules.
 Open live view.
 Open Device Manager.
 Open information window, display app version and help.
Adding & managing recorders
To add a recorder tap the menu selector button ![]() in the top left of the window.
in the top left of the window.
Then tap on the Device Manager button
Once Device Manager is open click the plus ![]() button to add a device
button to add a device
Next enter the details of your device. The list below outlines each field.
Add Device
- Site name : Allows you to add the device to an existing Site. A site is a logical entity representing a group of devices.
- Device name : Enter a name for your device.
- Device Type : Select the type of device you are adding.
- IP or DNS : Enter the IP or DNS address of your device here.
- TCP Port : Enter the TCP port of the device being added.
- TransCD Port : Enter the Transcode port (usually left as default).
- Username : Enter the username used to access the device.
- Password : Enter the password used to access the device.
Adding Sites and moving recorders
"Sites" allow you to manage multiple devices more efficiently.
New sites can be created from within the Device Manager window, by clicking on the add sites icon at the bottom of the window and entering a name.
Devices can be dragged into a site of your choosing by tapping and holding the .
![]() drag icon and dragging it under the text representing Site of your choice.
drag icon and dragging it under the text representing Site of your choice.
Re-synchronizing a devices camera list
If cameras have been added to a recorder or camera names have changed, you should navigate to the Device Manager window and tap the "Synchronize device camera list" ![]() button to ensure you have the most up-to-date camera list from the device.
button to ensure you have the most up-to-date camera list from the device.
Viewing Cameras live
Camera can be viewed live from the Live View window, to add a camera to Live view tiles follow these steps.
- Tap on the add camera icon

- Select the name of the device you wish to view a camera from
- Tap (tick) each camera you wish to open, you can select more than 4 cameras.
- Tap the "Open Cameras" icon
Opening camera Groups
If you have a group defined can you open the group by tapping the camera group name from the "Group" picker.

Closing Cameras
To close a single camera, tap on the camera to select it, then tap the close selected camera button. ![]()
To close all cameras, tap the Close all cameras button.
Changing stream quality
The stream quality wheel allows you to choose from 3 quality transcoded streams which are Low, Medium and High
Creating a camera group (favourite)
To create a camera group from the current open camera/s, tap the ![]() "Create group" button, then give the group a name.
"Create group" button, then give the group a name.
Taking a snapshot
To take a snapshot image of a camera, first tap the camera you wish to snapshot, then tap the Snapshot button ![]() , the image will be saved to your default photo folder.
, the image will be saved to your default photo folder.
Exporting Devices to another User
IMPORTANT *1 You should only export device lists to people you trust.
IMPORTANT *2 Importing the configuration will erase all your previous settings.
Note: The recipient must have the iFreedom app already installed before a config can be imported.
To export your current device configuration navigate to the Device Manager window and tap the ![]() Export button, this will open your default email application with an attachment.
Export button, this will open your default email application with an attachment.

Importing a Config into an iPhone or iPad
Open the email with the 'Freedom App Config' subject line, locate the attachment icon, then tap once to download, then tap and HOLD and select iFreedom from the list, you may have to swipe to locate the icon. (pictured below)
Obtaining version information and Help
To find out what version of the App you currently have tap the module selector then tap the Information button